Bathing Your Beauties


How to give your chicken a bath
There are times when it will be necessary for you to step in and give your chickens a bath. In water.
When a chicken is so muddy or dirty that preening their own feathers doesn’t do the job, it’s time. So is when they become infested with external parasites, making bathing a non-chemical first step in getting rid of parasites.
Begin with the last step
You will need to do the last step first: clean the coop! Your chickens will need a clean and tidy coop for them to return to once bathing is done. They will stay clean longer.
Also, if you are dealing with external parasites, there is no sense in washing parasites off of your chickens only to put them right back into an infested environment.
TIP: If you are bathing your chickens for a show, never wash them the morning of the show. Do it a week ahead, and they will preen all of their natural oils back into their feathers for lustrous effect.
Basic bath time supplies
Use 3 plastic bins, not buckets. The size of bins should be large enough for your chickens to stand up in and for you to be able to reach in and open the wings without interference from the side of the bin.
A bin that holds around 30 quarts is perfect. Place the bins on a sturdy table or bench—you will save your back.
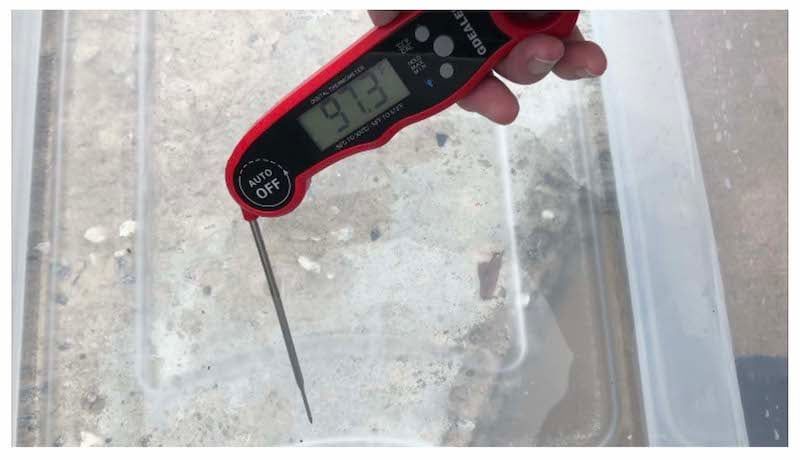
The water temperature should be about the same temperature as the human body. Chickens naturally have a higher body temperature than humans, so your goal is to have your bathing water between 95°F. and 100°F. Anything outside of this is uncomfortable for your chicken and will make the bathing process even more stressful that it already is.
Additional items
You will need an old toothbrush, a cup, towels, and perhaps a hair dryer.
The toothbrush is used to scrub the scales on the legs and also to gently clean the smallest feathers on the head.
The cup is used to scoop up water from the bath and pour it over the back of the chicken. The towels will be used when drying your chicken.
You may need to dry your chicken with a hair blow dryer that has a cool setting.
Lastly, you will need soap and white vinegar. Do not use whitening shampoo for dogs or horses on white chicken feathers as it can dye the feathers a shade of blue or purple.
Soap flakes are also a good choice as it is gentle on the skin and feathers. Don’t stress over fragrance—chickens do not have much sense of smell.
Setting up the bath
Most people bathe their chickens outdoors. Choose a warm day that is not too breezy. If you are bathing on a hot summer day, then you may want to set out your bins of water to warm in the sun early in the day. The water will be about perfect come early afternoon.
- Your first bin will contain soapy water.
- The second bin will contain vinegar water.
- Your last bin will have just plain water.
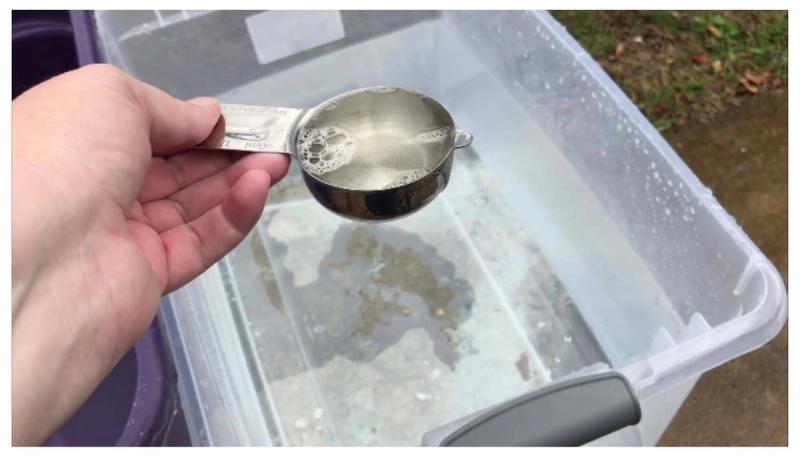
For a bin that holds 30 quarts, add just ¼ cup of soap. Mix it well in the warm water by hand without making many bubbles. Add ¼ cup of white vinegar to the second bin. Apple cider vinegar can work in a pinch, but it could potentially affect the overall color of a white-feathered bird.
It’s bath time!
Before you bathe your chicken, run your hands through all the feathers to dislodge any larger pieces of dirt or bedding hiding in the feathers—dirt pieces will fall out just during this step.
Put the toothbrush and cup in the soapy water bin. Place your chicken in the soapy water and always keep one hand on your chicken. They will float a bit at first, but then after a couple of minutes your chicken will figure out that they are in water.
Your chicken will flap and attempt to leap out of the water unless she has had many baths. This is when you will get wet.
Be ready for it.
Never immerse your chicken’s head in the water. Never get water in the ears of your chicken. Keep one hand under their head at all times.
Get the soapy water down to the skin ALL OVER THE CHICKEN. There should be no clumps of dry feathers or dry skin anywhere on the bird.
It should take15-20 minutes as you methodically work the soapy water through the back, under the wings, on the wings, down the tail, all around the vent, up the upper thighs, down the lower thighs, under the belly and to the breast, up the neck and under the chin.
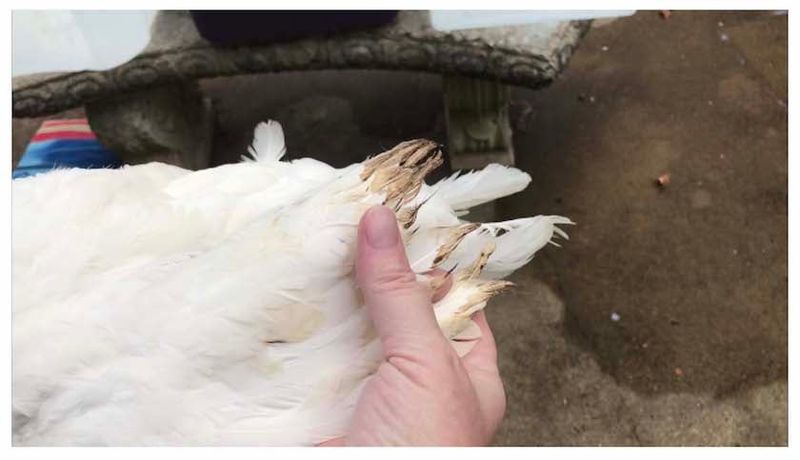
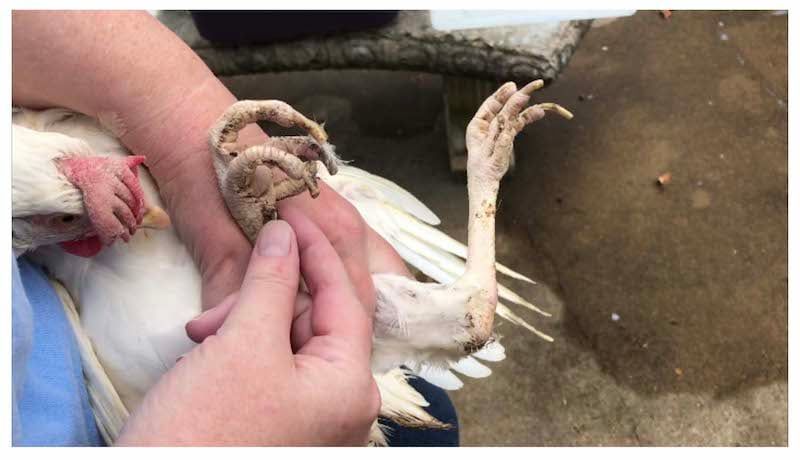
Use the toothbrush to gently coax soapy water onto the smallest feathers around the face, and to . gently scrub the comb and wattles. If your chicken has a crest, beard, or ear tufts then make sure they get suds too. Use the toothbrush to scrub the scales on the feet and legs. Any feathers on the legs and toes should be gently scrubbed with the toothbrush.
By this time the water should be quite dirty, often compounded by the chicken defecating. You might need to have a couple soapy water bins prepared if you are washing more than one chicken on a given day.
Two bins more
Now that your chicken is all soapy, squeeze most of the soapy water out of the feathers.
Your chicken is likely going to have given up struggling by now and should be fairly compliant…hopefully.
Move your chicken into the bin with the vinegar and repeat the entire process of getting the water down to the skin. The vinegar will cut the soap. Be careful to not get the vinegar water in your chickens’ eyes as this will irritate them.
Lastly, you will just rinse the vinegar off the feathers with warm water. Repeat the process of getting the feathers all over the body rinsed down to the skin. Resist the temptation to just pour water over the chicken’s head and take the time to use the toothbrush.
You’ll find that time spent in the final two bins is about equal to the initial soapy bin.
Dry time!
The hardest part of washing chickens at any time of the year other than summer is that they can get chilled.
So, after squeezing out as much water as possible from the feathers, wrap your chicken in a towel. Do not cover the head as chickens like to see what is going on.
Summertime—If you have a secure cage or coop that you can put outside in the sun then place your chicken in there. Summer’s heat should quickly dry your chicken. Take the towel off after 30 minutes because they will mostly likely defecate in it anyway. Provide water for them at all times, and check on your chicken every half our until they are dry—probably 2-4 hours depending on how warm it is that day.
Other times—If it is cool weather outside, then you will need to use a hair dryer.
The temptation is to blow the feathers backwards to get them dry sooner. (For some breeds with loose feathers, such as Silkies or Cochins, then this is fine.) Most breeds should not have their feathers blown backwards as this is uncomfortable for them.
Hold the hair dryer a full 12 inches away from the chicken and use the lowest heat setting. Chickens do not like the hair dryer focused on their face so it is better to hold the dryer over their head rather than in their face.
Never ever put damp or wet chickens back into their coop. They must be thoroughly dry before going back outside.
A new drying option
A cool new product to dry your chickens in the PePe Pet Dryer, which is basically a pet-carrier-sized drying room created for dogs and cats! It is the perfect size for chickens and provides a constant circulation of warmed, temperature-adjustable air.
In all my years of washing chickens, I have never had access to such a no-fuss device…it’s my new favorite chicken appliance!
Every 30 minutes, take your chicken out and run your fingers through the feathers to make sure that they do not clump together as they dry. The front door is see-through so you can make sure they are okay the whole time.
Tags:Plain Talk


Chicken Whisperer is part of the Catalyst Communications Network publication family.